
NewArrivalsInc

ApartmentTherapy
BuyModernBaby
Oooh aaah, super cute right? Only question now, was if I was actually brave enough to do it! I watched and read a billion tutorials on how to do it right... I mean how hard can it be? It's paint, tape and straight lines... nothing fancy... what could go wrong? Well if you have ever used tape and paint you know what you end up with looks nice from far but far from nice! My OCD-ness would just die if I ended up with lines that looked like this!

Mommy Loves Coffee
Another thought that held me back was What if I hate it down the road? Is it going to be a real pain in the butt to change later on? I have real commitment issues when it comes to decor, color or anything too trendy! So after obsessing over it for a while... I decided to take the less-committal road and just put up a tree wall decal instead! :( Not quite what I had in mind but they look pretty cute too... just check out these nurseries!

Project Nursery

CheapChicNursery
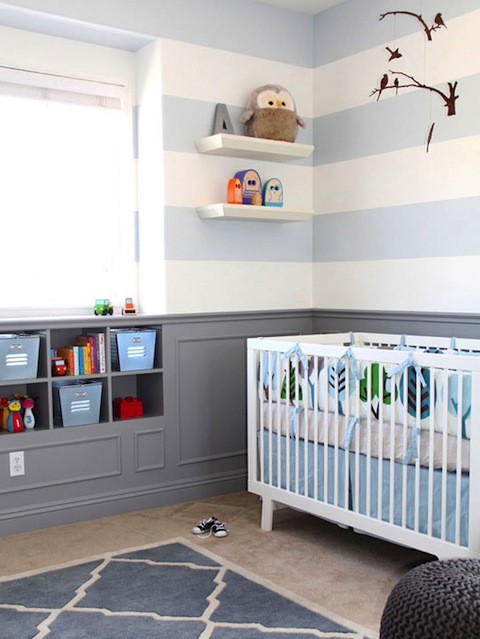
And then I had a DING-DING-DING moment as I was looking for trees (rare but I do get these moments sometimes)! I could just put up wall decal stripes! Does such a thing exist? It must! Especially if they have all these other fancy decals, they must have something as simple as a stripe! So off I set on a mission to find out! Seriously what on earth did we do before google? Anyways, wall decal stripes DO exist and they exist in different colors and thicknesses! Oh the choices!! Of course I ended up choosing white... remember the commitment issues with color? I ordered them from here, but there are a few places that sell them (just google it)!You would think that once they arrived in the mail, I would be uber excited to slap them on the wall. But I was also uber preggos and really didn't want to do much of anything! So they sat in the box for a good while until we realized we better get the nursery in order before the little monster decided to make her appearance! The stripes come 3 on a giant sheet which is super annoying. It makes it super difficult to apply one stripe while trying not to crinkle the other ones still on the sheet. Husband and I are pretty anal about things being perfect, so these stripes had to be really straight! I was very impressed with these wall decals because we probably peeled and re-adjusted the first stripe a gazillion times and had no problems. Once we got the first one on, the rest was easy peasy lemon squeezy!! Here is the finished project!

Check out the super crisp clean lines!! No paint bleeding here! Pretty sexy if I do say so myself!

No one has even noticed that these stripes are actually decals until I pointed it out! Best part is that they are removable AND reusable! How do you like them apples?
Where's is the pink bedding set from? On last pik.
ReplyDeleteThe bedding is from babybedding.com
DeleteWhat color gray did you use on your wall?
ReplyDeleteCIL Universal Grey (00NN 62/000 W/B) is on the light grey wall.
DeleteCIL Granite Grey (00NN 37/000 W/B) is on the accent wall with the stripes!
Where is the crib from? Everything looks beautiful :)
ReplyDeleteAwww thank you! The crib is a Babyletto Hudson crib. I bought it at Westcoast Kids but you can buy this crib from many places!
ReplyDeleteI absolutely fell in love with this nursery! How did you and your husband apply the stripes so straight and neat? I'm pretty anal about that type of stuff too!
ReplyDeleteWe measured 1 foot from the ceiling and marked it on the wall at each end and in the middle with a pencil. Then we tried our best sticking and peeling and re-sticking until it looked good! This product is pretty forgiving! We also used a leveler to check! Like I said, the first stripe is the hardest but after that you get the hang of it and the rest go on pretty easy! It is definitely a two person job for sure! We also left a little on each end and then used an exacto knife and ruler to trim the excess to keep it looking neat! Good luck!
DeleteWhat colour is the pink u used with the chevron for the bows and sheets?
ReplyDeleteThe bedding is from babybedding.com. These are the colors I used for the bumper:
Delete◾Inside Center: Solid Pink
◾Inside Corners: Solid Pink
◾Inside Ends: Solid Pink
◾Outside: Pink Zig Zag
◾Ties: Pink Sateen
◾Trim: Pink Sateen
Hope that helps!!
What was the thickness of the white stripes that you used? Love this, by the way!
ReplyDeleteHi there! What a fantastic room! What was the thickness of the white stripes you used?
ReplyDeleteThanks, Mel